How to create and edit email templates with Jinja
Introduction
Email alerts and notifications will be generated from templates written in Jinja, a robust and widely-used templating engine for Python.
This page provides instructions on creating and editing email templates in Jinja.
Downloading and editing the code
Email templates are stored in the Monitor Space Hazards Email GitHub Repo.
You can download this repository by opening the command prompt in your Github folder and running
git clone https://github.com/UKSpaceAgency/monitor-space-hazards-email.git
Make an account on https://app.postdrop.io/. Postdrop allows you to create new templates, you can copy and paste the code for an email template on the left hand side of the screen and see how the email renders in real time on the right hand side.
You’ll notice that jinja variables and the header and footer imported from base.jinja don’t render correctly in Postdrop. We’ll test these later once you’re satisfied with the design of the main content.
Writing your code
Extending base.jinja
New templates should extend base.jinja, this means they will reuse HTML and jinja code that has already been written, so any updates to the header and footer in base.jinja will apply to all templates.
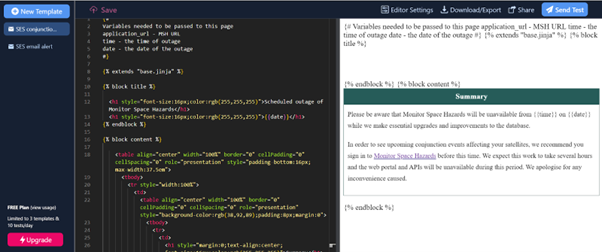
To extend base.jinja, you should use the following structure for new templates:
{#
Variables needed to be passed to this page
application_url - MSH URL
...
#}

{% extends "base.jinja" %}

{% block title %}

  <!-- title goes here as an h1 -->

{% endblock %}

{% block content %}

  <!-- Content goes here in tables -->

{% endblock %}
HTML and CSS
The building block of your template will be HTML. To style the template, you should use CSS. w3schools is a great resource for both HTML and CSS. You should write your CSS inline in the document as sometimes email providers do not recognise CSS written in style tags. For example, you can style text appropriately like this:
<p style="margin:0;font-size:14px;line-height:24px">
  Your text here.
</p>
Jinja
The jinja templating language allows you to insert variable inputs and to write conditional logic (show x only if y is true) or to have a variable number of rows in a template. For jinja files, double curly brackets {{such as this}} represent variable inputs that will be pulled from the API or other sources. As you write your HTML code, use the double curly brackets to signal where you would like variable text to appear.
You can refer to the jinja template designer documentation to explore some of jinja’s additional capabilities.
A drafted fragmentation alert template:
Variables and pulling API information
To include variables in the template, you can either reference any endpoint in the API or, ask developers to pass something through to the template from the backend.
Using the API
After you have made an account on Monitor Space Hazards, this guide provides a useful overview on accessing and using the API.
Authorise access to the API and find a report that possesses relevant information for your new email template. Download the single event/report of interest. The following screenshot is an example of a conjunction_event in the API.
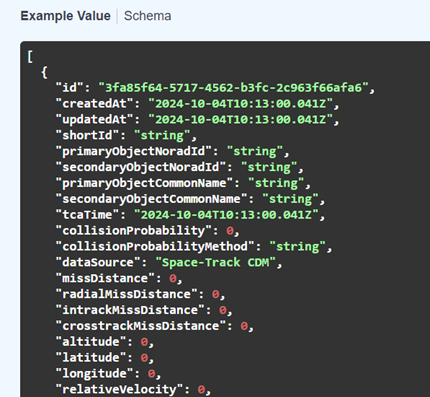
While the API fields may appear as Camel case if not updated, (camelCaseCapitalisesAllLettersWithoutSpaces), the email templates use snake case (where_text_is_separated_by_an_underscore_and_all_lower_case). When inputting your variable text within curly brackets, it will need to appear in snake case with a period stop separating your report name with the individual value or field you would like the variable text to display. For example, {{conjunction_event_report.short_id}} should pull the relevant string value from the above report.
Passing variables from backend
If you need some information which is not available as an API endpoint, you can define it yourself and request that backend developers pass it through. For example {{ application_url }} is passed to all templates.
Rendering your template locally with python
This method will allow you to view the templates with variables included and any code from base templates they are extensions of.
Prerequesites:
Make sure you have the monitor-space-hazards-email GitHub repository downloaded locally.
You will need to have python installed. You can download it via the Microsoft Store.
You will also need the python package jinja2. You can install it by running python -m pip install jinja2 in the command prompt
You’ll need to save the template you’d like to test in the html folder in the repo.
Open the file testing-resources/render_html_from_template.py in IDLE. Change the value of the variable file_to_test to the name of the file you’d like to render, and then run the program.
It will generate a file called test.html. Open this file in your browser to view the template.
In order to correctly render new variables added to the template, you will need to modify the file test-resources/test_json_data.json, which should contain any API endpoints you wish to use and variables being passed to the backend.
Testing your email template
Once you’re satisfied with how the template looks locally, you can push the changes to GitHub. This will only change how emails sent from the development environment look, and will not affect actual users of the service until a production deployment is made.
If you’ve modified an existing template, ensure the latest version is saved in
git checkout -b sm1
Replacing sm with your own initials.
Then, to push your changes, enter the following commands
git add --all
git commit -m "Write a message here describing the changes"
git push
Finally, navigate to https://github.com/UKSpaceAgency/monitor-space-hazards-email and accept the pull request.
Testing emails sent from dev
If you’ve created a new template, it will need to be set up in the backend before it can be sent out by the service. However, if you’d edited an existing template, your changes will automatically be seen in new emails sent by the development environment once you’ve pushed them to Github.
Testing across email clients
Different email clients will interpret and render your code differently, leading to potential visual issues with the way your email is displayed. You should check how your email renders in popular clients so you can correct for any issues.
You can do this by forwarding an email to an account in that client and checking how it renders. testi.at is a useful resource for checking yahoo and AOL without needing an account with either. For testing apple mail on a mac, check if the development team have an appropriate email address you can send to that they’ll return a screenshot of.
Use the SES email manual testing spreadsheet to keep track of each email client you have tested.
Sending an email from Outlook locally
In some instances you may not wish to have to push your changes to the remote repository to check the email’s appearance in an email client. In this case you can use Outlook to load and send them.
To set up a button to do this in Outlook, right-click on the ribbon. Choose “Customize the Ribbon”. Then Click “New Group” and name it “SES templating”. Finally click on your newly added group in the right box of the window and add “Attach File” option from the left box. Now you have your button.
To send your template as an email, start drafting a new email. Click “…” under the Home tab of your ribbon and scroll down to find the “Attach file” button you created. Navigate to and select test.html from the monitor-space-hazards-email Github repo, which can be generated to mock up an email by following the instructions in “rendering your template locally with python” . Finally, click on the tiny dropdown button next to “Insert” and click “Insert as text”.
Summary of standards for email templates
This section details guidelines you should follow when designing templates on MSH to ensure consistency in code written and aid with compatibility across email
Each email template should extend base.jinja. This will ensure consistency of header and footer formatting while allowing for customisation of both, as well as complete flexibility in central content.
Each email template should contain the subject line in a Jinja comment at the top of the template. For example
{# Subject: Your Subject Line Text Here #}Variable names should be written in snake case.
The variables used in each email template should be included in a Jinja comment at the top of the template. When a variable’s contents are not immediately clear from its name, a description should be provided. For example
{#
Variables used
conjunction_events - list of conjunction events
application_url - MSH url
#}
CSS should be written inline rather than in style tags as this implementation is widely supported by email providers.